Wednesday, April 30, 2008

Blog neglect

I wrote a short post about googly eye earrings for Things Worth Making, but I'm neglecting this blog for now. I'm feeling a little frazzled, but it's nothing serious. I'm just adjusting to my new job. Once the first few weeks are out of the way, I predict I will feel much better. I mean, once the May long weekend is here, I predict I will feel much better. I keep having anxiety dreams about exams, which is especially strange since I rarely had these dreams during school time.

I'll tell you about my trip to Vancouver when I get a chance to write. In the mean time, you should go see the documentary Young @ Heart.

Making googly eye earrings


Remember how I planned to make googly eye earrings? I started scheming when I discovered how easy it is to make earrings. As you can see, I went ahead and did it, and I found out that making earrings is even easier the second time around.

I made this set of five earrings for my sister, who has the option to wear all of them at once, which I highly encourage. I'll try to convince her to take a picture when she receives them.

I tried one out, for interim modeling purposes, and I almost crazy glued the thing to my ear. That's right, I took your advice and used crazy glue instead of my glue gun, even though the stuff scares me silly. I know someone who crazy glued his eye lids shut! The things I do for my sister. And for this website.

Wednesday, April 23, 2008

She's so hot she's making me sexist

Michael and I have watched five episodes of Flight of the Conchords. Bust describes the show as a mash-up of Curb Your Enthusiasm, Weird Al Yankovic, Borat, The Monkees, The Muppet Show, The Office and Keith Partridge. It sounds like a nightmare, but we've fallen in love Brett and Jemaine. Here's a clip that features my favorite song to date:


Also, check out my post about bookplates on Things Worth Making! I decided that I don' t have a problem telling you what's up on my other blog. If you don't like making things, don't look. Deal?

Making your own bookplates


Bookplates are labels pasted into a book, often on the inside front cover, to indicate its owner. Sometimes the bookplate says Ex libris, which means From the books of [your name here]. That's what Wikipedia tells me anyway.

I love bookplates, but I've never bought them for myself because they're too pricey. If I wanted to put a store-bought label in each of my books, it would be an expensive proposition indeed. That's why I was happy when Raissa gave me homemade bookplates for Christmas.

Even though I was thrilled with the gift, it took me a few months to put one of the bookplates to use. This morning I stuck one in West With the Night, one of my favorite books, in order to counter my late grandma's claim to the book. Who writes her name in a book that someone loaned her? Trying to get this book returned to me was a trial, and it didn't help that my grandma thought it was hers. These bookplates aim to prevent such confusion.


I don't know where Raissa found her assorted images, but maybe I can convince her to enlighten us. In the mean time, I found these two adorable designs (scroll down a bit) at Craft Sanity, which were provided by The Black Apple. You can print them on label paper, for easy application, or regular paper, which will require some help from a glue stick.

During my Internet sleuthing, I also found some great pictures of archived bookplates that I want to share with you. You can browse through the UBC digital collection yourself, or you can check out my favorites, which I've listed by the names of the book owners (pretty interesting themselves): Henry Forbes Angus, Erna Grau, George Herbert Wailes, Wallace and Ethel Wilson and Kevin Michael Grace (this one scares me a little).

If that doesn't satisfy your new interest in bookplates, you can check out Confessions of a Bookplate Junkie. That's right, a whole blog dedicated to bookplates. Who knew?

Monday, April 21, 2008

Afternoon Royal Tea

I finished my last exam on Saturday night! My degree is complete and my convocation will take place in June. Phew. It's been a long time coming. I am now a political scientist, friends. Watch out!

I have several celebrations planned - such as a weekend with Michael (he's writing his last exam right now!) at the Moda Hotel in Vancouver and family time with Mom, Dad, Shannon, Chris AND Baba in June - but the first event already took place: Afternoon Royal Tea at the Empress with Jen.


I was ready to sign up for the plain old Afternoon Tea, but Jen, who has things of her own to celebrate like, you know, her recent marriage, insisted that we fancy it up with a glass of bubbly. I still think the sparkling wine/tea combination is a bit strange, but who am I to judge what the Empress says is appropriate? Anyway, it made for entertaining Sunday afternoon conversation.


Check out the goods! After the sparkling wine and fruit we moved onto tea and treats. The bottom tier features the tea sandwiches: cucumber with light horseradish, smoked salmon pinwheel, mango and curried chicken, carrot and ginger and multigrain crostini topped with a mixed mushroom pate. The middle tier is home to traditional English raisin scones, clotted cream and strawberry preserves. The top tier features lemon curd tarts with glazed berries, Battenburg cake, Earl Grey tea shortbread, chocolate cake and a marble chocolate tulip.


The scones were my favorite part of the feast. I didn't hold back with the cream, as you can see.


I drank gallons of tea, but I still managed to take a long afternoon nap when I got home.


Well versed with the ways of tourists, our server offered to take a picture of us when she spotted my camera. Maybe you can't tell, but we dressed for the occasion in smart casual attire, as per the dress code. That is, we're wearing skirts, not jogging pants.

I'm so happy that Jen pushed me to stick to our tentative plans for tea, which have been brewing for a couple of months now. I hesitated before making the reservation because the whole experience is a little pricey, as you might imagine. But Jen was all, "Erin, I've spent money on dumber things than tea at the Empress." And how.

Wednesday, April 16, 2008

New buddy

There's a new baby in my life, and I'm pumped! This is what he looked like before he was born:

Michael and I made stew for the new parents, and I got to deliver it earlier today. It was the perfect gift, because I got to hold the baby while the parents ate lunch. The baby is one day old, friends! And I held him! I don't want to go posting pictures of other peoples babies (unless it's my nephew, of course) and I don't want announce anything that I'm not supposed to announce, but I'm sure you can figure out who the parents are if you've been reading my other blog.

Oh yeah, my other blog. I just updated it today (it is Wednesday). Are you tired of me advertising the other blog on this blog? I'm tired of it. Maybe I'll just write NEW POST! beside the link every time I write a new post? I'll work on it.

Making an encouraging banner


Miranda July and Harrell Fletcher told me to make an encouraging banner, so I did. I mean, they encouraged me to make one through their website Learning to Love You More:

"Participants [of Learning to Love You More] accept an assignment, complete it by following the simple but specific instructions, send in the required report, and see their work posted online. Like a recipe, meditation practice, or familiar song, the prescriptive nature of these assignments is intended to guide people towards their own experience."

Assignment #63 instructs participants to make an encouraging banner. I didn't follow the exact instructions, which is why I never submitted a picture to the website. Which is why I'm telling you about it instead. I think it would make a nice present.

This is what it looks like all together (when you see it in real life you can see the letters on the cards, trust me):

Instead of cutting out letters and gluing them to big pieces of construction paper, like I was supposed to and like everyone else did, I wrote on some cute paper from Urban Source (a shop in Vancouver that sells reclaimed craft supplies), and I taped the individual letters to a piece of yarn. Sometimes we need to be reminded to take a break from the computer. You know?

Now I want to make one for public display, and maybe I'll follow the rules this time.

Wednesday, April 09, 2008

Working girl

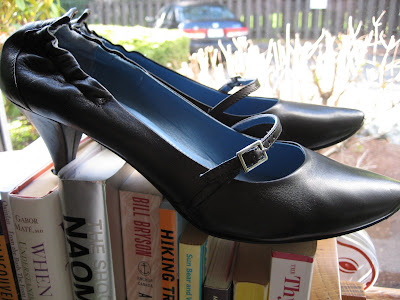
I have a job! I start sooner than I would like, but that's just a small quibble. The best part is I don't have to feel guilty about buying these shoes at Nordstrom's in February. I justified the purchase because I felt that they would add an air of professionalism to my imaginary job. Did they ever.

Other news:

My parents were here and we had a great time walking around town, taking pictures of animals, drinking coffee and eating out. I miss them. I put a few pictures on Flickr.

Check out Things Worth Making to see the first guest post by my buddy Jen. You should submit something to that blog too. You should know that the school assignment part of that blog is done now, so there is no incentive for good grades...

Guest post: Making Zoe's baby quilt, or the fruits of March Madness

By: JEN [let the guest posts begin!]


Watching this many hours of NCAA college basketball has to have strong effects on a person. Each March I watch hundreds of people realize how far hard work and talent can take them. The glory of victory, the sting of defeat and grace in the effort. The magic of sports! It's all enormously compelling! It is my favourite sporting event, and every March I turn into a bit of a recluse as I take it all in.

What more natural response than to start a quilt? Right?

SO...I went to my piles of fabric, as yet untouched, and picked out 8 prints that I hoped would go together...this is the first quilt that I have done totally by myself, from fabric selection and design (I guess that's what one would call it!) to binding and tying etc, so I was a bit nervous that it would all make sense...

I ironed the fabrics and cut 3" squares according to my hot planning and math (pictured above). Then I laid the squares out so see what made sense, patterns-wise (below).


To my great delight, I stood up and saw that my 'lay the squares down in the same order' thing makes a pretty nice pattern! I liked how the dark and lighter ones spread out, and that dark yellow! A risk with hot results!

I picked the rows of squares up in order and sewed them together into strips. Then I pressed them and sewed them together! Ta da! Quilt top: DONE! It's not a buzzer-beating 3 point shot to take your team to the Sweet Sixteen, but it's pretty impressive anyway!


I pressed the quilt top (above)...this is when things really start coming together!

Next, I laid the quilt top out over a larger piece of fabric backing and some quilt batting. I pinned these three layers together so that I could tie and bind it without having the layers move around too much (/at all!).


The 3" squares are a really nice size. They make 2.5" squares once they're sewn up!

It really was coming together well, and QUICKLY! I have to admit, I was really excited when I got to this point....I mean, CHECK IT OUT! It looks like dessert to me, all bright and frothy...and my second try at cutting and sewing has yielded MUCH better results, corners-wise. They match up much better than quilt #1!

NOW, in my enthusiasm for the quilt binding fabric that I found in my stash (ALL of this fabric was in my stash...a proud achievement indeed!), I forgot that you are supposed to tie/quilt first, and THEN bind. I blindly forged ahead with binding...as seen below! Note the pins! Order of operations, ignored!


In order to bind, you cut fabric in strips (here 2.5" strips). Press the strips in half lengthwise, wrong side together. Pin the strips along the edge of the quilt so that all of the cut edges (the cut edges of the binding and the quilt itself) are together. Sew these layers together with a 1/4" seam allowance.


To finish the binding, you have to hand stitch (or at least, I hand stitched) the binding over the rough edges and onto the back side. Check out that delicious pale green gingham! Hot stuff!


Once the binding was on, I tied the quilt with cotton perle. I didn't tie on every corner since I thought that might be overkill. I think I was right!

I'm pretty new to quilting but tell me: HOW could I resist a hobby that lets me collect, iron, cut and combine these kinds of fabrics in order to make BLANKETS?! The truth is, I can't resist. I am sold!


So, to the new Hartley-Carter, enjoy this blanket! It was such a treat to make for you! And to Stephen Curry, sophomore sensation of Davidson College, congratulations to you and your team! You were a joy to watch this year, and I hope next March I will get to watch you raise the bar again...who knows what kind of quilting response I'll have by then!

Wednesday, April 02, 2008

Making plans for a log cabin pillow


I've been scheming about making a log cabin pillow for years, but it looks like it's finally going to happen. I bought some material at a sewing and crafts show last weekend, and I can't put it off any longer. Actually, I can. I just read this post from Whip Up, and the author suggests I use five to ten fabrics for my pillow. I only have four.

I'll still do it though, because my buddy Jen is on my team. Once I top up my fabrics, and once my school projects are done for the semester, we'll spend a Sunday afternoon together seeing my tentative plans through. Right, Jen? I need your quilting knowledge to keep me inspired.

I expect the final product to look something like this pillow by Dacia Ray (mostly because I plan to use her instructions). And then there's all of the pillows on this photo set on Flickr. I expect I won't be satisfied with just one pillow.